2. Maintenance & Users: Managing users and notifications
Table of Contents
2.1. User Accounts: overview of users in the workspace
The User Account section displays all registered users of the application, including their status, login activity, assigned role, and mailing preferences. Each row in the list contains the following details:
User list – Shows each user’s code, name, last login, last action, account Enabled, role, e-mail and mailing enabled. You can also download a report with an overview of all users and their settings. By clicking on the small black triangle before the code you can change the settings for users:
Change role – Assigns roles such as Admin, Manager, or special modes (Readonly, Project User, Meeting User).
Enable/disable account – Activates or deactivates user access to the system.
Update password – Allows password changes for selected users.
Mailing enabled – Toggles whether the user receives system-generated emails.
2.1.1 People and Users in your workspace
The list of people can be accessed from the left menu. Simply click on the “People” name to open the list of registered individuals in our tool. This comprehensive list displays the names, photos, email addresses, job titles, and company information of all individuals.
Only admin users are allowed to delete a person from the list.
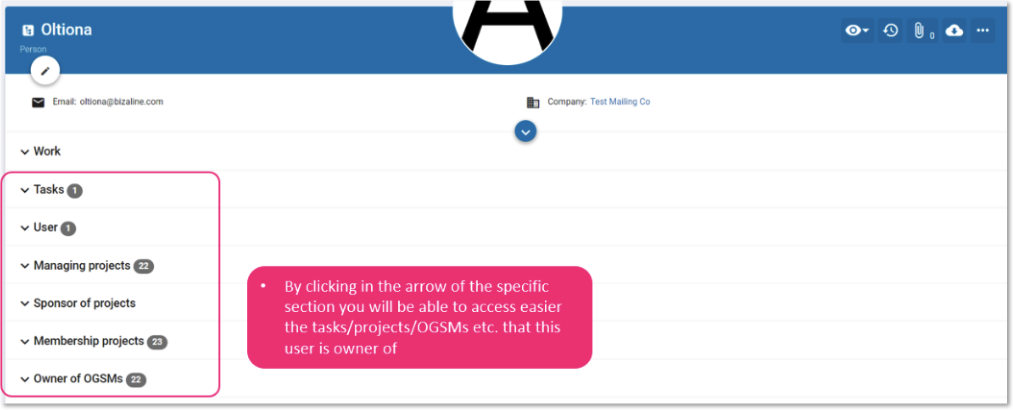
By clicking on an individual’s name, you can access their overview page, which displays all relevant information such as their assigned tasks, linked users, projects under management, tasks, dashboard measures, requirements, and participation in meetings.
When creating a person in your tool, it’s important to note that they do not have access to the workspace. The primary reason for creating a person is to assign specific actions, KPIs, or steps to individuals who may not have access to the tool itself. This allows you to designate responsibility for these tasks to the appropriate parties, even if they are not registered as users.
By including a person’s email address, you can also communicate with them via email and receive updates on their progress without requiring them to become registered users of the tool. This allows for greater flexibility in managing tasks and projects, as well as facilitating collaboration with individuals outside of the workspace.
2.1.2 Difference between people and users: definitions
The differences between a person and a user:
A person does not automatically have access to the tool. They need to be invited. Persons with a User Name have access to the tool. A user can access the tool and based on its role can see/edit/delete things inside.
Users are the “people” that interact with the software. Is someone who is able to login in our tool and based on its role can do specific actions.
2.1.3 How to create a person (without access to the workspace)
Via the left menubar go to the People feature:
and add a person by hovering your mouse over the people menu (a plus icon will appear) and click on it
Make sure you fill in the name field, which is mandatory
You may also enter the person’s email address if desired
Note: From any feature in the software you can create a new person (and user), by adding them as an owner of that object, for example a Project or a Risk. The software will recognize that the person does not yet exist and will enable you to create a Person and optionally create a User Account for them. .
2.1.4 Create person and directly invite user
There are two ways to create a Person / User:
This is the same way we create a person, with the difference, in the “Create new person/user” popup you should also check “Invite to Workspace” option and select a role
2. Create a user from the Admin panel
You add a user from the Admin panel ‘Users’, by clicking on the plus button in the bottom right corner. The disadvantage is that you don’t know if the person was already created and may lead to duplications.
Warning: use an unique user name if you have multiple workspaces in combination with SSO, otherwise you will receive an error message.
2.1.5 Convert a person into a user
You have created a Person in the past, who you have not yet invited. By clicking on the Person and on the “Invite to workspace” option via the 3 dots in the top right hand corner, you can invite as a user.
To invite an existing person to join the workspace as a user, follow these steps:
Open the workspace and navigate to the left menu.
Click on the person icon to access the person page.
Locate and select the name of the person you want to invite.
In the top right corner, click on the three-dot menu icon (“…”).
From the menu options, choose “Invite User.”
Provide the necessary information:
Fields:
Name – The full name of the person.
Email – The email address linked to their account. Required for users, optional for persons without login access.
Tick boxes:
Invite to workspace – Converts the person into a user by sending them an invitation email to join the workspace. Without this, the record will remain as a person only.
Send email notifications – Enables system-generated emails for this person/user, such as updates, changes, or mentions.
Buttons:
Cancel – Closes the window without creating the record.
Create – Saves the person record. If “Invite to workspace” is selected, the person becomes a user and receives an invitation email immediately.
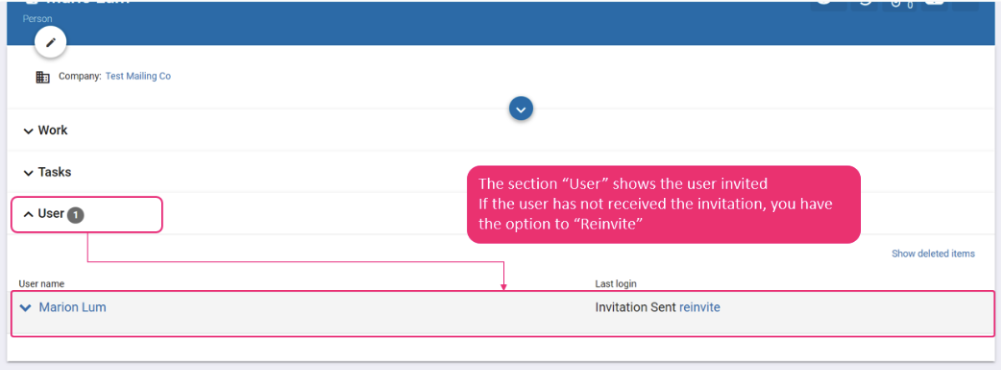
2.1.6 Have the users accepted the invitation?
Once the the user is invited you can check if they have accepted in the User section or in the Admin Settings under User Accounts
2.1.7 A user has left your organization: how to deal with this?
On the People page you can see all Tasks, projects etc owned by this person. When a person has left your organization you should delete the User name not the Person. You transfer the ownership of each individual item to their successor(s). This can be done manually or via an Excel upload file. Please note that ask our service desk for assistance via info@bizaline.com.
2.2 User roles and permissions
2.2.1 What are the main user Roles?
Admin Role:
The Admin role has full access to all features of the workspace.
Admins can create and delete items within the workspace.
They have complete control over the workspace settings.
Manager Role:
Managers have access to all features within the workspace, except for workspace and Admin settings.
They can create, edit, and delete items, collaborate with other users, and contribute to the workspace’s activities.
User Role:
Users have limited access to the workspace.
Users can only update objects via email notifications, unless specific exceptions are made for a specific feature by the Admin.
They can only access their own personal settings
2.2.2 Specific User modes per feature or per user
There are also some specific user modes per feature or per user (see 2.1) that override the permissions and roles:
User Mode
Description
Read-only user mode
Everything is read-only
Project user mode
I only see projects that I belong to
Meeting user mode
I only see meetings that I am an attendee
How admin users can enable users to above modes:
Open the users list
Click in the arrow of the person you want to make read only
Check the box to be “Read-only mode”
2.2.3 Permissions
This page shows the default permissions per role, view, edit, create, or delete. These permissions can be adjusted per feature.
Entity list – Displays all entities in the system (e.g., Projects, Tasks, Logs, Addresses).
Role columns – Each column represents a role (ProjectUser, User, Editor, Manager, Admin) with configurable permissions.
Permission levels – Options range from view-only access to full create, edit, and delete rights.
Global settings – The top row (“All”) applies the same permission setting to all entities for that role.
Granular control – Individual entity rows allow overriding the global setting for specific cases.
2.2.4 How to check if someone has unsubscribed from emails
You can verify this in the person’s history.
Go to Person.
Click the three dots in the top-right corner.
Select Settings.
Go to Reminders.
Open History.`
If you see the entry: “System Person modified Mailing enabled? from ‘true’ to ‘false’”
then the person has unsubscribed from receiving emails.