The MyContractManager AI agent can assist by identifying which requirements need to be verified and by automatically determining frequency and due dates. It can identify Requirements, including KPI’s. Contact your account manager for more information.
2.1.2 Creating your Requirements manually
To create a requirement, hover over the Requirements tab in the left menu and click the + icon. Alternatively, open the list of requirements and use the + button in the bottom-right corner. Both options open a popup where you can enter the requirement details.
Add a Requirement via Quick Add
Ensure that you complete the following fields:
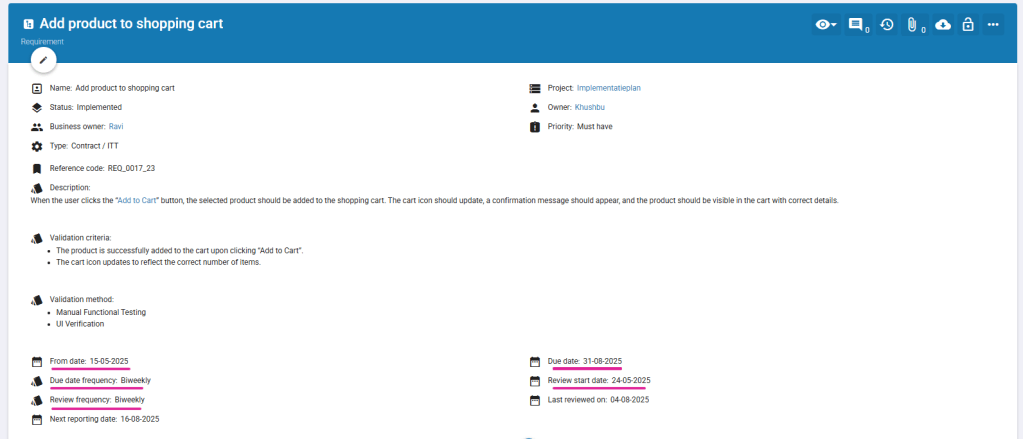
Requirement Name: Descriptive title for the requirement.
Requirement Type: Distinguish between Contract ITT, External/ Committed Obligations or Stakeholder aspirations (optional).
Status: The default status is “New.”
Roles: assign an Owner, Reviewer (optional) and Business Owner (see section 1).
Due date: Specify the due date for the requirement. Date by which the owner must demonstrate compliance.
From date: Initial compliance date – not linked to the review cycle.
Add Requirement details via Overview page
Open the full Requirement screen to create your Requirement or add (further) information:
2.1.3 How to bulk upload requirements (via Excel)
When monitoring requirements, it is often more efficient to create multiple requirements through an Excel upload. In the Admin manual you can find more details on how to create an upload file.
Steps for uploading requirements:
Use a MyContractManager upload template (example shown below)
Fill in the relevant columns
Now, Go to Administrator > Import data from Excel file
Select file and click “Import from Excel” button
The requirements will be uploaded and shown in the requirements tab.
Requirement notifications can be automated to ensure timely delivery. There are two monitoring options: Due Date Cycle and Review Cycle.
2.1 Due Date Cycle – Basic option
Sends reminders on the due date, as well as one week before and one week after. After completion, the next due date is automatically scheduled. If the delivery is overdue, the next due date is calculated from the current date.
For example, a safety certificate must be delivered annually on 1 December. The Due Date Cycle will send reminders around this date and automatically schedule the next due date once the requirement is completed.
Settings for Due date Emails:
Due date – first day a requirement needs to be compliant. Note: this date will change over time if the due date frequency is not ad hoc or One off)
Due date frequency
The following notifications are sent out:
Due date reminder – 7 days before the due date
Due date – on the due date itself
Overdue email – 7 days after the due date
2.2 Review Cycle - Advanced option
Sends Requirement review requests based on a defined review schedule.
For complex requirements, monitoring only at the due date may not be sufficient. The Review Cycle provides regular progress checks to assess whether compliance is on track before the due date. This is particularly useful during long implementation periods or for critical requirements requiring more frequent review (e.g. quarterly). The Review Cycle operates independently of the Due Date Cycle.
Settings for Review Emails:
Review Start Date – Defines when review reminders begin.
Review Frequency – Defines how often review reminders are sent.
2.3 Getting the basics right for receiving notifications
To receive requirement-related email notifications, ensure the following settings are configured:
Workspace Email Setting – Email functionality must be enabled for the workspace.
User Email Setting – Email notifications must be enabled for the individual user.
Email Address – A valid email address must be entered for the user.