1. Setting up ‘General - Workspace settings’
The Workspace Settings section allows administrators to configure how a workspace behaves and appears for all users. This includes setting the workspace name, default language, time zone, and visual preferences.
You can also link the workspace to a company profile and define the types of documents and features that are available. Changes made here apply across the entire workspace and affect all users, so they should be managed carefully.
1.1 Workspace Settings – setting up your workspace
- In the left-hand menu, click Administration to expand the section.
- Select Workspace settings.
- Use the available tabs to view and adjust settings such as General, Features, Reminders, Status Updates, Security, and Other.
Important Notes:
- Changes to these settings affect all users in the workspace
- Some settings may require administrator privileges to modify
- Consider the impact on existing data before changing currency or date formats


In the General Settings section, you can define the identity and behavior of the workspace.
Below you find an explanation of each field:
- Reference Code: The software automatically creates an identifier for your workspace, you can change this manually. It is important that this code is unique if you have multiple workspaces.
- Name: Set the name for your workspace; this appears in the interface header and navigation
- Created Date: Shows when the workspace was initially created. Format: DD-MM-YYYY HH:MM (automatically set).
- URL Slug: Defines the web address extension for your workspace. Used in the browser URL to access this specific workspace.
- Workspace Type: Select from available types (e.g., “Contract Management”). Determines the primary function and available features.
- Currency Code: Set the default currency (e.g., “EUR”)
- Currency Fraction Digits: Specify decimal places for currency display (typically 0-2)
- Default Company: Link to your primary company profile
- Default Strategic Plan: Associate with your strategic planning documents
- Default BidDoc: Set standard bidding document templates
- Default Requirement: xxx
- Language: Set the default language for the workspace interface. This affects all new user interactions and system messages.
- Slack notifications enabled?: Enable/disable Slack notifications for status updates
- Show codes: Toggle whether system codes are visible in the interface. Useful for technical users who need to see internal references.
- Time Zone: Configure to your local time zone (e.g., “Europe/Amsterdam”). Ensures accurate timestamps and scheduling
- Date Format: Set preferred date display format (e.g., “dd.mm.yyyy”)
- Status Update Notifications delay (days): Set delay in days before notifications are sent.
- Turn on overdue after number of days:
Here you can turn specific features on or off within the workspace, like projects, KPIs, or contract requirements. This helps tailor the platform to the actual needs of your team.

- Admin: Grants access to all administrative settings and configuration options for the workspace.
- Admin Excel import/export: Enables importing and exporting of data in Excel format for admin-related content.
- Gantt: Displays project timelines in a Gantt chart format.
- Guided tour: Provides an interactive walkthrough of the workspace for new users.
- Internationalization: Enables multilingual support for the interface.
- Invite User: Allows inviting new users into the workspace.
- Kanban: Displays tasks in a Kanban board view for visual progress tracking.
- Overview: Provides a general overview dashboard of key workspace elements.
- Main project structure: Activates the main hierarchical project structure in the workspace.
- Remote connect: Allows connection to external systems or workspaces.
- Switch account: Enables switching between different user accounts without logging out.
- OGSM: Enables OGSM strategic planning functionality.
- Project / Contract Timesheets: Allows logging and managing time entries for projects and contracts.
- Google Authenticator: Enables two-factor authentication via Google Authenticator.
- BidDocs: Provides document management tools for bids and proposals.
- Strategic plans: Enables creation and management of strategic plans.
- Companies: Allows managing company profiles and related data in the workspace.
- Document folders: Allows creating and organizing folders for storing documents.
- KPIs: Enables setting, tracking, and reporting on Key Performance Indicators.
- Departments: Allows defining and managing departments within the workspace.
- Meetings: Enables scheduling and managing meetings.
- People: Manages the list of individuals within the workspace.
- Projects: Enables creation and management of projects.
- Project risks: Allows managing and tracking project-related risks.
- Risk Measures: Enables setting and tracking risk mitigation measures.
- Project tasks: Allows defining and tracking tasks within a project.
- Requirements: Enables management of contract or project requirements.
- Project Sprints: Activates sprint planning and tracking functionality.
- Timesheets: Enables timesheet logging for tracking work hours.
This section allows you to manage which reminders the system sends out.
For example: status updates, deadline reminders, or custom alerts.
You can decide how often reminders are sent and who receives them.

- Mailing enabled?: Activates all email reminders in the workspace.
- Slack notifications enabled?: Sends reminders via Slack (requires Slack integration).
- Assignment mailing: Sends an email when a user is assigned to an item.
- Timesheet mailing: Reminds users to submit or update their timesheets.
- Subscription mailing: Sends updates for items/ objects a user is subscribed to.
- KPI mailing: Sends notifications for KPI progress updates.
- KPI mailing (reminder): Sends a follow-up if KPI updates are overdue.
- Project / Contract status mailing: Sends emails about project or contract status changes.
- Project / Contract status mailing (reminder): Sends follow-ups for overdue project or contract status updates.
- Risk status mailing: Notifies users for risk status updates.
- Risk status mailing (reminder): Sends reminders for overdue risk status updates.
- Task/Issue/User Story status mailing: Sends emails about to ask for updates in tasks, issues, or user stories.
- Task/Issue/User Story status mailing (reminder): Sends reminders for overdue task, issue, or user story updates.
- Due Project / Contract mailing: Alerts when a project or contract deadline is approaching.
- Due Task/Issue/User Story mailing: Alerts when a task, issue, or user story deadline is near.
- Requirement status mailing: Notifies users when a requirement’s status update should be given.
- Requirement status mailing (reminder): Sends reminders for overdue requirement status updates.
This controls automatic updates related to certain objects in the system, such as contract steps or KPI changes. Admins can configure how and when these updates appear.
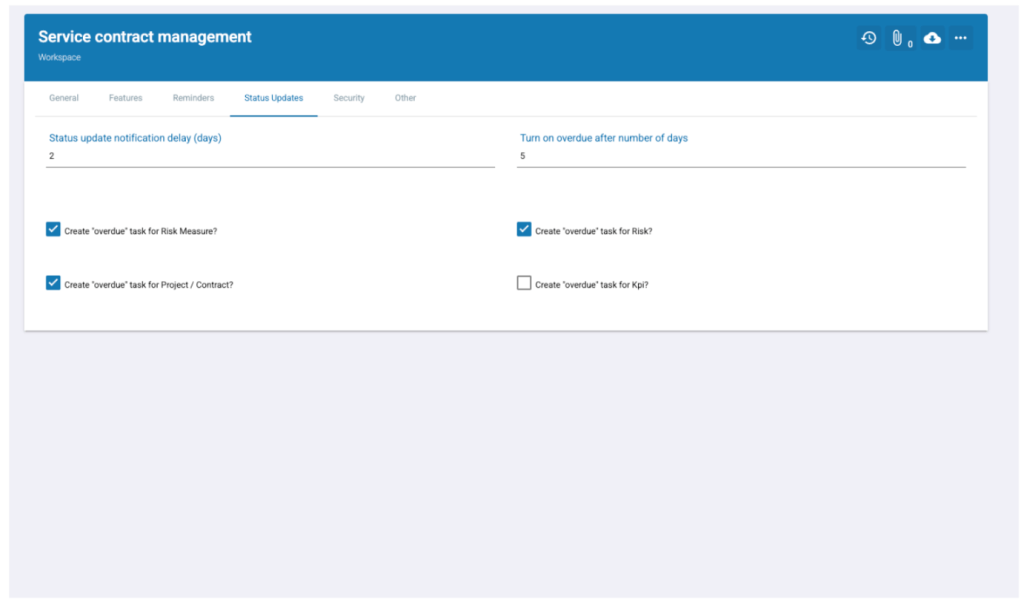
- Status update notification delay (days): Number of days after the planned update date before a notification is sent to relevant users.
- Turn on overdue after number of days: Number of days after the planned update date before the system marks the item as overdue.
- Create “overdue” task for Risk Measure?: When enabled, the system automatically creates a task if a risk measure’s update is overdue.
- Create “overdue” task for Project / Contract?: When enabled, overdue project or contract updates automatically generate a task.
- Create “overdue” task for Risk?: When enabled, overdue risk updates automatically generate a task.
- Create “overdue” task for KPI?: When enabled, overdue KPI updates automatically generate a task.
Use this page to connect Single Sign-On (SSO) or manage login requirements.
Admins can enforce password rules, control access methods, and set other workspace security preferences.
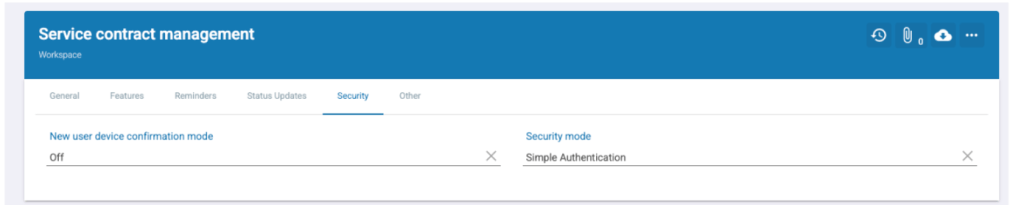
New user device confirmation mode: Determines whether users must confirm new devices before logging in. This can be set to:
- Off – Users can log in from any device without confirmation.
- On – When a user logs in from a new device (e.g., a new laptop or phone), they must confirm the device through an email or code verification step. This prevents unauthorized access from unknown devices.
Security mode: Here you can set the required authentication level for your workspace. The 4 security modes are shown.
- Simple Authentication: Standard username + password login. Easiest for users, lowest security.
- Two-Step Authentication: Password + extra code (email or SMS). Adds protection against stolen passwords.
- Single Sign-On (SSO): Log in with company account (e.g. Microsoft, Google, Okta). Centralized and secure.
- Google Authenticator: Password + time-based code from Authenticator app. Strongest protection against phishing.
This section includes additional workspace settings, such as linking to a parent workspace or enabling advanced features.

- OGSM contains Risks?: Determines if OGSM plans should include the Risks module.
- OGSM2 as default?: Sets OGSM2 as the default framework for all new projects.
- Default start page URL: Allows setting a custom URL as the default landing page for workspace users.
- Use default company logo: Toggles whether the standard company logo is shown in the workspace.
- Mailing dashboard enabled: Enables the mailing dashboard for tracking and sending communications.
- Project Status Update include budget fields?: Adds budget-related fields to project status updates.
- Include estimates in the Project Progress page?: Displays estimate fields in the progress view.
- 7 day work week: Adjusts scheduling to allow for a seven-day working calendar.
- Gantt assignment % based on hours: Calculates Gantt task percentages based on hours rather than task count.
- Show OGSMs as list in left sidebar?: Displays OGSM items in the navigation sidebar.
- DocuSign enabled?: Activates DocuSign integration for signing documents.
- Sync between workspaces: Allows data and configurations to sync across different workspaces.
- Auto-create OGSM data cache?: Automatically generates cached data for OGSM plans.
- Sync files to AWS S3?: Connects the workspace to an AWS S3 bucket for file storage.
- Microsoft To Do sync: Enables synchronization with Microsoft To Do tasks.
- Amazon SQS sync: Integrates with Amazon Simple Queue Service for messaging and automation.
This page shows the list of external applications that have access to the MyContractManager environment using OAuth2. It is a secure authorization standard that lets an application access specific data without sharing user passwords.
For the workspace, this means:
- Only approved external apps will appear here.
- Each app’s permissions can be reviewed and revoked if no longer needed.
- This ensures that integrations (for example reporting tools or HR systems) can safely exchange data with MyContractManager without exposing user login details.

You can bulk import data into the system using a properly formatted Excel file. This allows adding, linking, and updating multiple records at once for any database table, provided the sheet and column names match the required structure. Standard templates and guidance are available at info@bizaline.com.
Warning: importing via Excel overwrites current data—only include information you want to change. For templates and guidance, contact info@bizaline.com

- File selection – Choose an Excel file to upload.
- Sheet structure – One sheet per database table, with the table name as the sheet name (case-sensitive).
- Header row – Each sheet must start with a heading row containing the column names (case-sensitive).
- Optional columns – These can be omitted if not needed.
- Ignored columns – Any columns not in the database are ignored.
- References – Use the ‘code’ value to link to existing items or earlier rows.
- Null values – Type “NULL” (uppercase) in a cell to clear a field value.
- Auto sort entries – Automatically sorts imported records.
- Generate report – Option to create an import report after processing.
- Import button – Click Import from Excel to start the upload process. If you checked your upload sheet.